Points & nodes — Precision digitizing
What is the Points tool for?
Section titled “What is the Points tool for?”Precision, tap-to-place digitizing — instead of drawing a freehand stroke with your finger or Pencil, you place individual nodes one at a time and StitchPencil connects them. It’s the tool of choice when you want exact control over a path, or when you’re tracing something with sharp, deliberate corners.
What’s the “Line vs. Pairs” chip I see for satin?
Section titled “What’s the “Line vs. Pairs” chip I see for satin?”When you’re placing nodes for a Satin object, a small chip in the bottom context bar switches between Line (you place one centerline, and StitchPencil derives both rail edges from it plus a width) and Pairs (you place the two rail edges independently, node by node) — useful when a satin column needs to taper or shift unevenly in a way a single centerline-plus-width can’t express.
Does the Pencil do anything special in Points mode?
Section titled “Does the Pencil do anything special in Points mode?”On hover-capable Apple Pencil hardware, hovering near the screen shows a live rubber-band preview of where the next node will land, before you actually tap it down.
How do I get into an object’s nodes?
Section titled “How do I get into an object’s nodes?”Tap Nodes in the tool rail, right under Select. Nodes is not a tool of its own but the way Select answers a tap — as Points belongs to the drawing Stitches — so both buttons are lit.
- Tap an object and its nodes open at once, through a group too.
- Tap another object and you are in its nodes. There is nothing to confirm; every node edit applies immediately.
- Tap the same spot again to dig one layer deeper, as Select does — that is how you reach a small object under a satin or inside a fill. A smaller object right under the finger also gets the tap where it would otherwise have put a node on the edge of the big open object; exactly on that object’s line the tap stays with it.
- Tap empty canvas to put the object down; Nodes stays on.
- Switch Nodes off (or tap Done) and the object stays selected and gets its frame back: the same object, once as a whole, once in its nodes.
A small bar on the canvas goes with it: the open object’s name with Previous and Next through every editable object in sewing order (“12 / 48” — working through an import layer by layer), Corner/Round for the selected node, Delete and Done. You do not need the layer panel for any of it: it does not open by itself in this mode, and closing it does not end the node editing. The slower controls — smoothing, the width at a node, simplify, reverse direction — remain in the inspector.
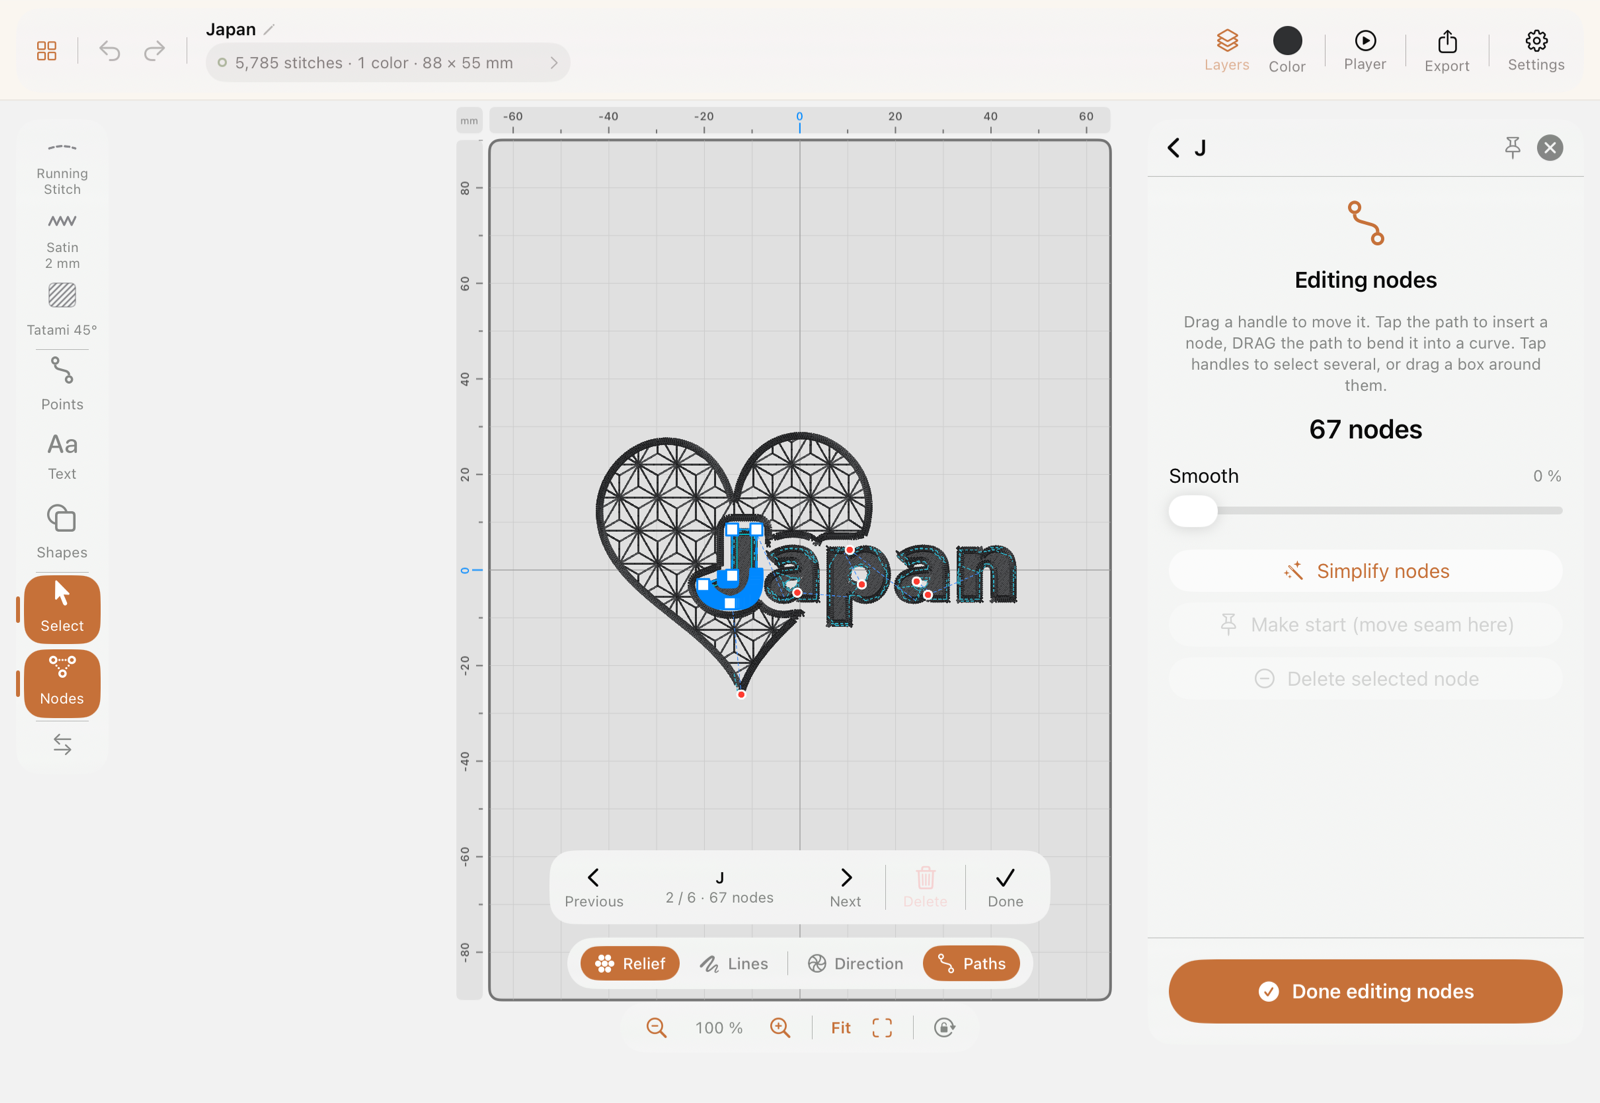
The Nodes tile in the selection bar and in the inspector is still there; it switches the same mode on with the selected object already open. Live text and locked layers open no nodes and say why. A design never opens with Nodes on, so a tap meant to move something does not land in its nodes; after switching to drawing and back it is still on.
How do I edit an existing path’s nodes?
Section titled “How do I edit an existing path’s nodes?”Once a path is focused for node editing:
- Drag a handle to move a node
- Drag along a segment between two nodes to bend it into a curve
- Drag a tangent grip (the small circle beside a curved node) to change how the line leaves the node. A grip never reaches past the neighbouring node: any longer and the line would overshoot it and fold back into a spike
- Tap a segment to insert a new node there
- Double-tap a node to delete it
- Drag the orange grip next to a selected node to change how WIDE the column is at that spot
How do I fix one spot that came out too wide?
Section titled “How do I fix one spot that came out too wide?”A stroke drawn with Pencil pressure carries its width along its length — thin where you were light, thick where you pressed. That is usually the point. But when the line itself sits perfectly and one place came out too thick, the object’s Width slider is the wrong tool: it moves all of it.
Select the node at that place — or tap the path to insert one exactly there, which places it with the width it already has — and drag the orange grip that appears beside it. It sits at half the column’s local width, with a smaller twin on the far side: the change is symmetric, so the centreline you tuned stays exactly where it is.
The change eases back to what it was on either side, so what you get is a swell or a taper rather than a dent. Below 1 mm the cover reads as a line rather than a column, and 20 mm is as wide as a column goes — the grip stops at both. (Past roughly 10 mm the column is sewn as a staggered split rather than one very wide throw, so it stays stitchable; see Satin.)
Blue grips move the line, orange grips change its width. And the object-wide Width slider still works on a column you have shaped locally: it scales the whole profile, so the thinnest place lands on the slider’s value and everything you shaped keeps its proportions.
A letter I drew came out angular. Can I round it afterwards?
Section titled “A letter I drew came out angular. Can I round it afterwards?”Yes — that’s what Smooth is for. Open the object for node editing and you’ll find a Smooth slider in the inspector, from 0 % (leave it exactly as drawn) to 100 %.
What it does is lay a curve through the nodes you already have. It does not move them, does not add or remove any, and does not redraw the shape: the path still passes through every node, it just arrives and leaves in a curve instead of a kink. So the outline you positioned stays where you positioned it, and a stroke that came out as a chain of short straight segments reads as one continuous bend.
Corners survive. A sharp turn is treated as a deliberate corner — the tip of a V, the inside of an L — and stays sharp no matter how far you push the slider. Smoothing rounds the wobble, not the design.
Drag the slider and the stitches follow live, so you can stop at the point where it looks right rather than guessing a number. One drag is one undo step.
On an O or any closed ring it works the same way, all the way around the loop, including across the point where the ring closes — there is no seam at the start node.
On a satin column the two rails follow the smoothed centreline together, so the column keeps the width you gave it at every node. And on a puff section, smoothing the columns also moves the placement outline and the tack run with them — they are derived from the same shape.
Smooth lives in the node editor and works on one object at a time, deliberately: it is a shape edit, and shapes are edited per object.
Can I smooth just one part of a line?
Section titled “Can I smooth just one part of a line?”Yes. Tap the node where the piece should start, then Stretch to …, then the node where it should end. The piece between them is highlighted on the canvas, the slider is now called Smooth the stretch, and only that piece moves.
This is the tool for the end of a stroke that swung out when you lifted the pencil, and for a single loop in a cursive letter. Everything outside the stretch stays exactly where it is, and the strength runs out towards the two ends of the stretch, so the joints do not become kinks. At the free end of an open path there is nothing beyond it to protect — pick a stretch that contains the tip and the tip is ironed into the line, which is the point of it.
On a ring there are two ways round between two nodes. The shorter one is taken, and Other side flips to the other. Clear drops the stretch and the slider is back to the whole object.
What controls only show up while a node is focused?
Section titled “What controls only show up while a node is focused?”Make start (choose which node the machine begins stitching from), Make smooth / Make corner (toggle a node between a curved and an angular join), Reverse direction, and Simplify nodes (reduce an over-dense path to fewer control points). These live only in the focused node-editing inspector state — you won’t find them anywhere else.
What does Simplify nodes actually change?
Section titled “What does Simplify nodes actually change?”Only the number of nodes, never the shape. Every candidate it considers is built exactly the way the column will be built, then measured against the edges the object already has: it is only accepted if no edge moves more than 0.35 mm and no stitch turns more than 12°. A hand-set column of 107 nodes on a straight run collapses to a handful; the mitred end that gives the shape its corner keeps its node, because dropping it would move the edge.
If nothing can go without changing the shape, nothing goes, and a message says so rather than leaving you to wonder whether the button worked.
What are the coloured grips on a selected node?
Section titled “What are the coloured grips on a selected node?”- Blue — the node itself. Drag to move it.
- Orange — the column’s width at that node, one on each side. They move together, so the node stays on the centre.
- Purple, on a dashed leader — the angle of the stitches at that node. It only appears at an end that is genuinely angled, which normally means an end the Knife cut on a slant. Drag it to re-aim that end; the rest of the column does not move.
A green ring marks the first stitch and a red one the last — those are markers, not grips.